
What Has Changed?
Microsoft’s April 2026 Windows security update (KB5082200 for Windows 10 / KB5083769 and KB5082052 for Windows 11) has introduced new behaviour when opening Remote Desktop connection shortcuts (.rdp files).
You may now see one or both of the following new prompts:
- A one-time educational warning the very first time you open any RDP file after the update.
- A “Caution: Unknown remote connection” security dialog each time you open an unsigned RDP shortcut — with all resource-sharing options (clipboard, printers, microphone, etc.) turned OFF by default.
What does “Unknown remote connection” mean?
This warning simply means Windows cannot verify that the shortcut file was digitally signed by a known publisher. It does not mean the connection is unsafe — it is a new security check Microsoft has added to all unsigned RDP files.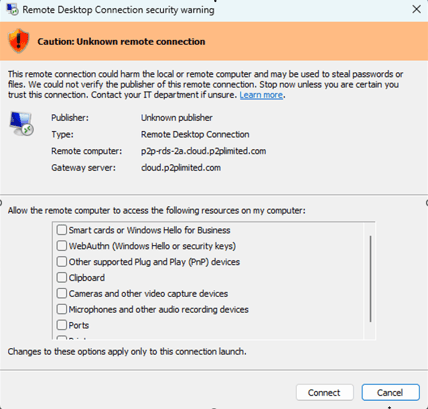
Why Has Microsoft Made This Change?
This change is a direct response to a significant rise in phishing attacks that abuse Remote Desktop files. Here is how those attacks work:
- Cybercriminals send malicious .rdp files via phishing emails.
- When a victim opens the file, their computer silently connects to a server controlled by the attacker.
- The attacker’s server can then access the victim’s local drives, clipboard contents (including passwords), printers, cameras, and even authentication credentials.
Microsoft’s new safeguards mean that:
- All resource-sharing options are now disabled by default when connecting via an RDP file.
- Users must consciously choose which resources (if any) to share before connecting.
- Windows displays clear warnings so users can verify the connection before proceeding.
What This Means for Your Remote Desktop Connection
Because your existing RDP shortcut is not digitally signed (this is normal for most business shortcuts), Windows will now show the security warning dialog every time you open it. Additionally, settings such as clipboard sharing, printer redirection, and microphone access will no longer be saved automatically — you will need to re-enable them each session, or follow the steps below to download a fresh shortcut.
⚠ Your saved shortcut still works
You can continue to use your existing RDP shortcut. However, your previously saved preferences (clipboard, printers, etc.) will not carry over. You will need to re-tick them each time you connect.
How to Update Your RDS Connection
The Windows security update means your existing RDP shortcut will no longer save your resource-sharing preferences between sessions. There are two recommended ways to fix
- Option 1 – Windows App: Use this if you connect directly by IP address (no gateway).
- Option 2 – Cloud P2P Portal Shortcut: Use this if you connect through a gateway (cloud.p2plimited.com) or prefer the rds icon on the desktop.
Option 1 – Windows App (Connecting by IP Address)
The Windows App from the Microsoft Store replaces the old Remote Desktop Connection client and lets you save all your resource preferences permanently against each saved connection. Use this option when you connect to your remote server using an IP address.
- Open the Microsoft Store, search for “Windows App” and click Get / Install.
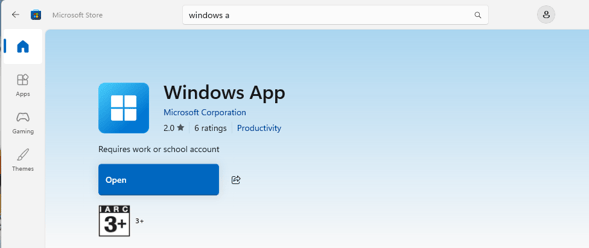
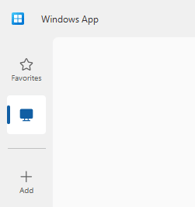
- Open Windows App. Click the + Add button at the bottom-left of the sidebar to add a new PC.
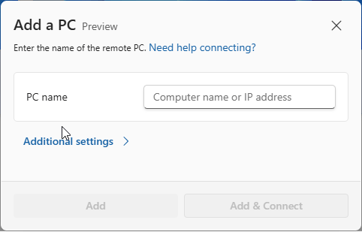
- In the “Add a PC” dialog, enter the IP address of your remote server in the PC name field, then click Add.
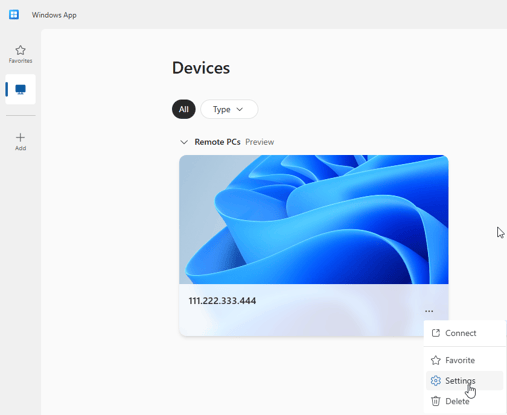
- Your new connection appears in the Devices list. Click the … (three-dot) menu on the connection tile and select Settings.
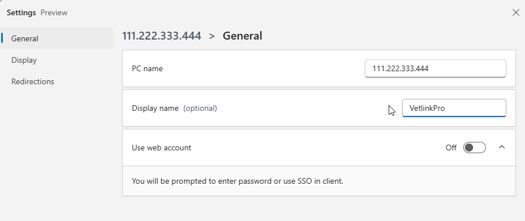
- In the Settings panel, go to the General Enter a friendly Display name (e.g. “VetlinkPro”) so the connection is easy to identify.
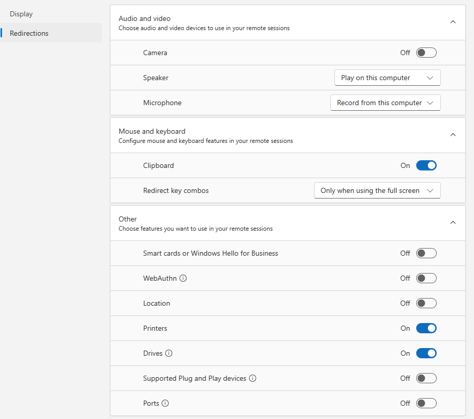
- Click the Redirections tab and enable the resources you need for this connection:
- Clipboard – Enable to allow copy/paste between your local PC and the remote session.
- Printers – Enable if printers are not installed on the remote session and you need to print from your local workstation.
- Microphone – Set to “Record from this computer” if you need microphone access in the session.
- Drives – Enable if you need to access drives on your local workstation from within the remote session.
- Close the Settings panel. Double-click the connection tile to connect.
ℹ️ Note The first connection will ask for your username and password. Future connections will log straight in without prompting.
Option 2 – Cloud P2P Portal Shortcut (Gateway Connections)
Use this option if you connect through a gateway. Downloading a fresh RDP shortcut from the portal allows you to tick your resource preferences once and have them saved for future sessions.
- Open your web browser and go to cloud login (as supplied by VetlinkPro support staff). Log in with your cloud username and password.
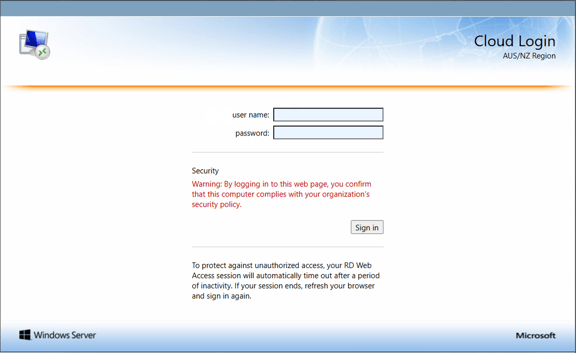
- Double-click the RDS icon to download the RDP file. The file will save to your Downloads folder.
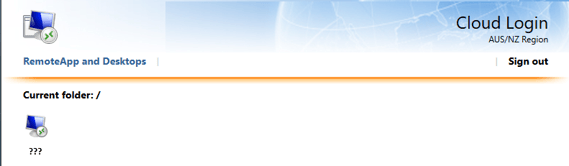
- Copy the downloaded RDP shortcut from your Downloads folder to your Desktop for easy access.
- Double-click the shortcut to connect. The security dialog will appear. Tick the resources you need, tick “Remember my choices for remote connections from this publisher”, then click Connect.
- Clipboard – Enable for copy/paste between local PC and remote session.
- Printers – Enable if printers are not installed on the remote session.
- Microphone – Enable if you need microphone access in the session.
- Drives – Enable if you need local drives accessible in the remote session.
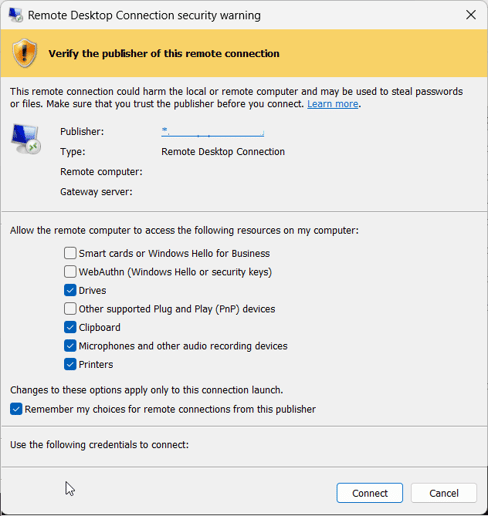
- Enter your username and password when prompted.
- Disconnect and reconnect to confirm the connection opens without asking for your password again.
ℹ️ Note If the connection still prompts for a password after reconnecting, follow the Credential Manager steps below. - If the connection keeps asking for your password, save the credentials manually in Windows Credential Manager, then re-enter them in the RDP file.
- From the Windows Start menu, search for and open Credential Manager. Click Windows Credentials, then click Add a Windows credential.
- In the Internet or network address field enter: TERMSRV\*** (gateway details supplied by VetlinkPro support)
– then enter your username and password and click OK.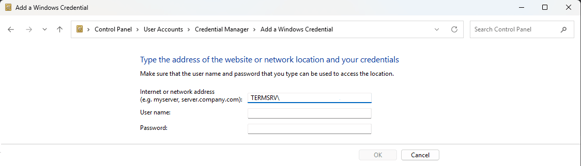
- Right-click the RDS shortcut on your Desktop and select Edit (or Show more options → Edit).
- In the Remote Desktop Connection dialog: go to the Advanced tab → click Settings → click Edit → re-enter your credentials → click OK. Return to the General tab and click Save.
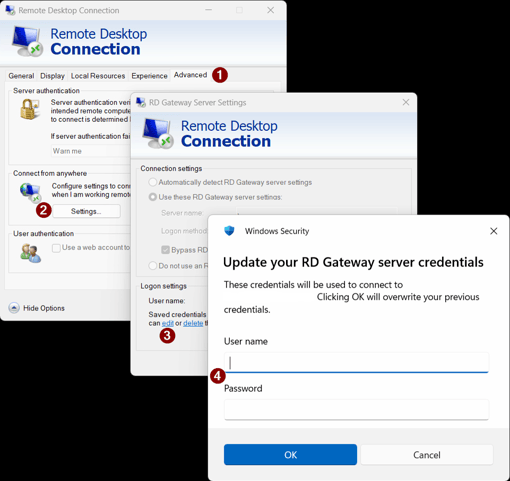
- Try connect again.